Using Document Templates, you can create documents with custom formatting and layout straight from BigWave. If you are familiar with creating a mail merge in Microsoft Word, then the process is very similar with BigWave documents. Using Word, you create a document template in the format you desire, identify replaceable text, and then substitute field codes for those pieces of text.
There are 4 types of documents that can be generated from BigWave.
- Approval Type
- Invoice
- Quote
- Work Order
This document describes the process for creating “Work Order” documents, which just means the document looks for fields that are relevant to a work order. The other 3 types work similarly. There is an article for each of the other 3 types as well, but those will only cover the nuances associated with each type. Otherwise, all work the same as described here.
Let’s walk through a concrete example for a Work Order document type. The scenario is we have an installation project for AT&T/Nike and want to create a printable work order technicians may take with them if, for whatever reason, they don’t have access to the work order online.
Download the Work Order Form.docx used in this tutorial
On our sample printable work order, it needs to show…
- The work order number (work order ID)
- The site address and phone number
- The scheduled start date/time for the site visit/installation of the assigned person
- The name of the manager for the location
- The description of the work to be done
- The technician instructions
- The circuit location custom field value
- The circuit ID custom field value
Let’s explore where each of these values are found in a BigWave work order from our project.
In the Details section we find the work order number, site location, site phone number, description of work, and technician instructions.

In the Schedule and Assign section we find the scheduled dates. Notice there are 2 activities for this work order with 2 different technicians assigned. If Cliff Ombasa prints off the work order or Steven Brevett prints off the work order, it should only show the scheduled dates for that person. More on how to get to this later, but keep this concept in mind.

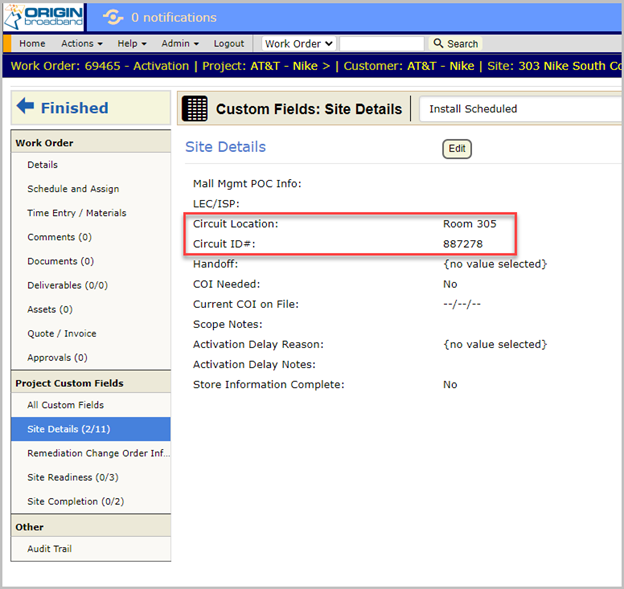
Our custom field values are found in the custom fields section.
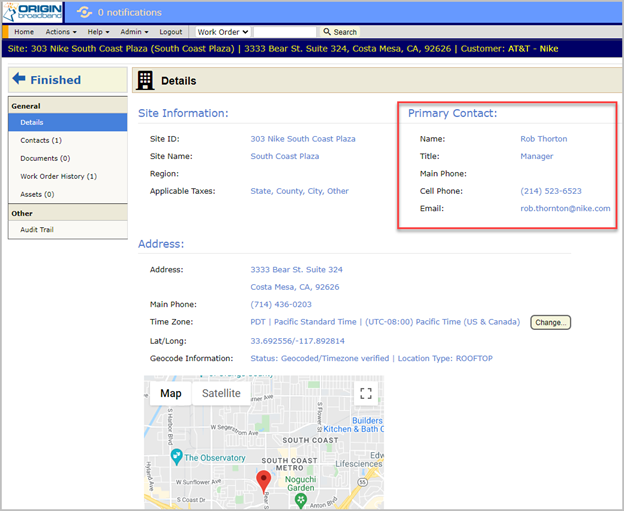
And, finally, the Site Manager Name. It’s not completely obvious looking at the work order, but the Site Manager is, in our example, set as the primary contact for the location/site. There isn’t really a site manager concept as that term may or may not be relevant to any particular user in BigWave, but, for our example, we are specifying the site manager to be the location’s primary contact.
Now that we understand where all the fields come from and where their values lie, let’s, using Microsoft Word, create a sample printable work order to your liking. We created the following as a sample. Notice we made use of tables, bold text, and adding our logo to the header. You can create your own however you desire!
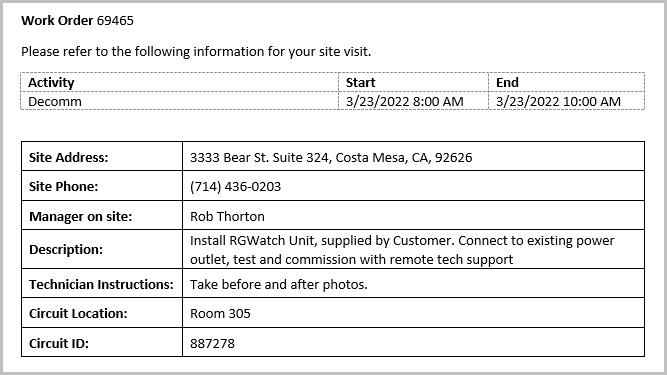
Using this document template, this is what we want our final output to be for work order 69465.
However, those field values are simply typed into our sample. We need to replace the representative values with fields. Once everything is set up, you direct BigWave to Generate a document from an opened work order, and the correct values from that work order populate the printout.
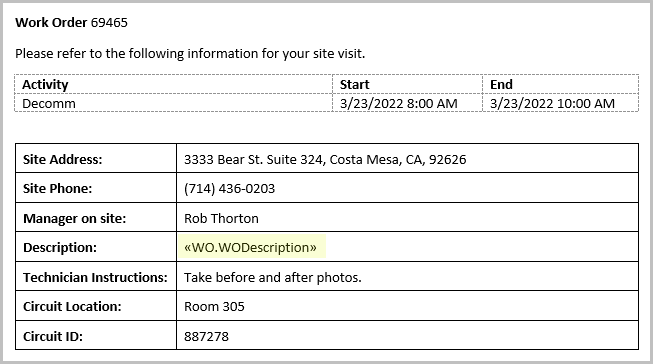
The simplest field to replace is Description. We replace the typed in value with a Word MergeField and we give that field a value of WO.WODescription. You can’t simply type in what you see below. You have to use the Insert/Quick Parts/Field/MergeField option in MS Word.
Read – How to insert a field using Microsoft Word
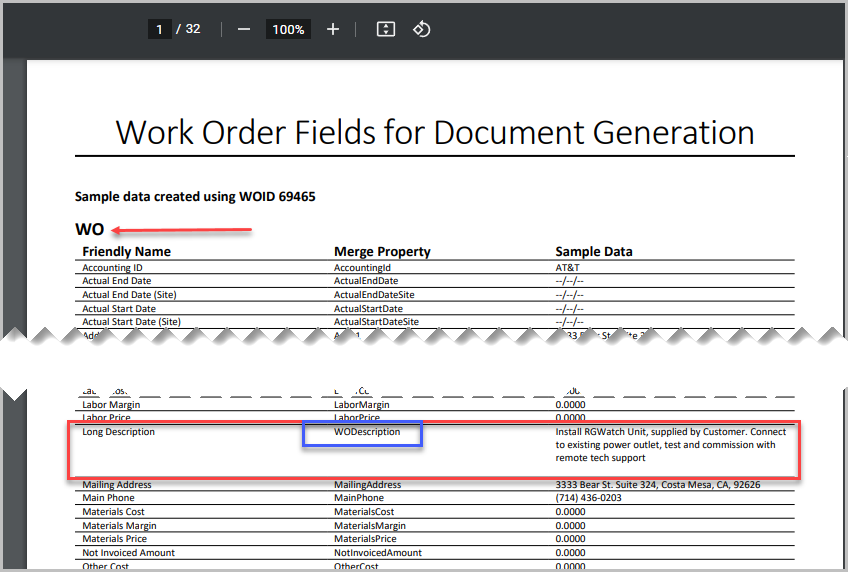
How do we know to use WO.WODescription for the value? Using BigWave, you can download a PDF that contains all the available fields for a work order. Using this PDF, you can search and find any field you need for your document. The first part of the value WO is a scoping mechanism. You can ignore this for now, but it’s fully explained later in this tutorial.
To access the PDF that contains all the fields, from the menu choose Actions/Setup, and then Document Templates/Download Merge Fields.
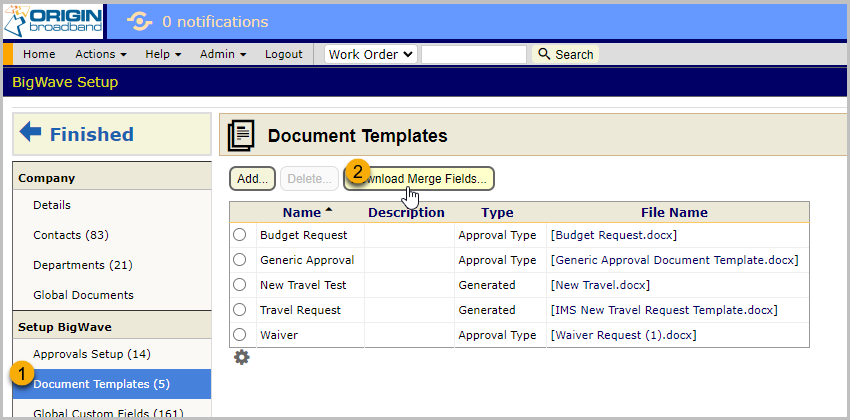
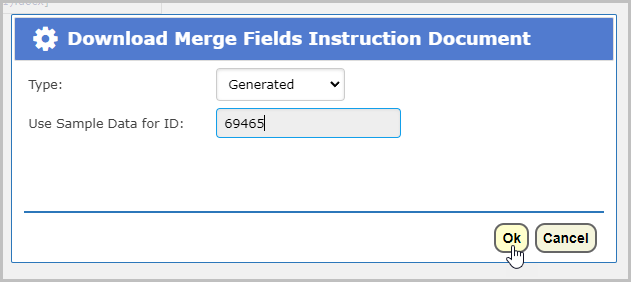
Clicking Download Merge Fields shows this dialog. Optionally, enter a work order number to see sample data that field returns. When scanning/searching the Generated Document Fields PDF, you can use the sample data to fully understand and verify the field you need for your Word document.
A Generated Document Fields (69465).pdf is downloaded. In the sample data we can see the correct Description data from our work order, so we can see the correct field is called WODescription (the friendly name column represents the label when that field is added to a grid). Always use the field from the “Merge Property” column for the Word MergeField value. And, we must “scope” our field to the WO scope (shown at the arrow). More explanation on scoping is to come. For now, use WO. In front of the field name.
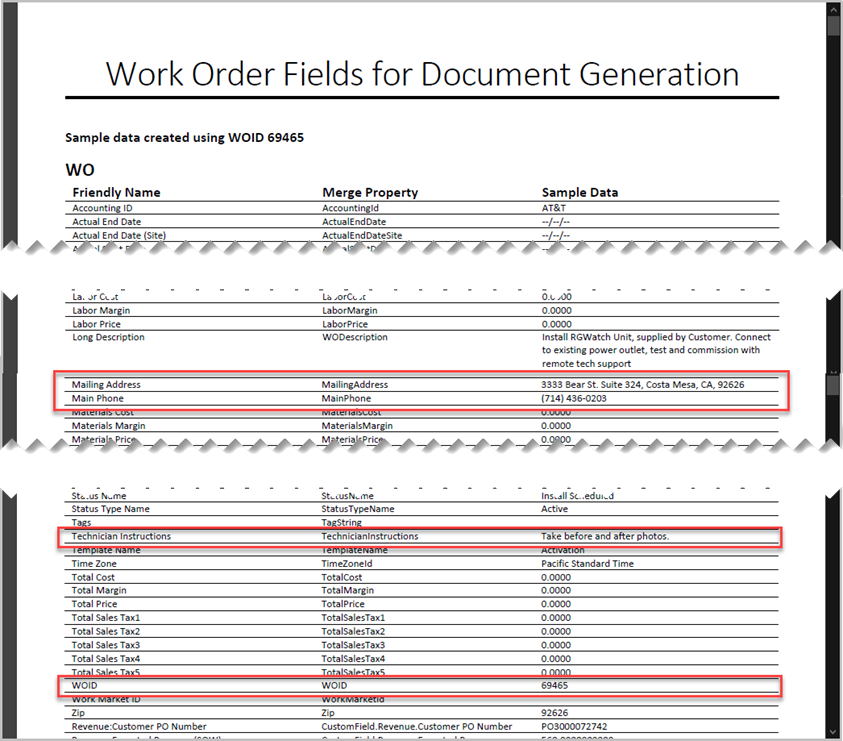
Moving on, we can see the Site Address, Site Phone, Technician Instructions, and Work Order ID are found similarly.
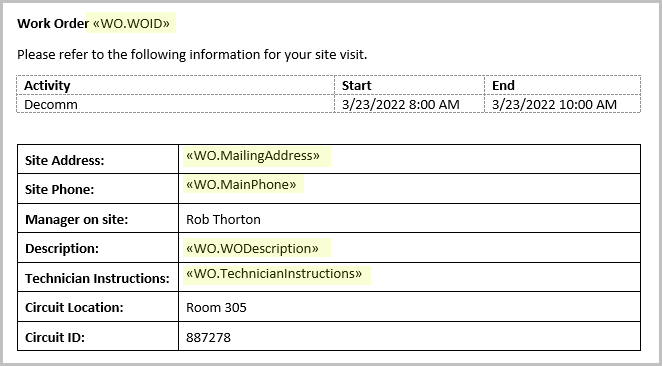
Now we replace the representative values in our document with these MergeFields.
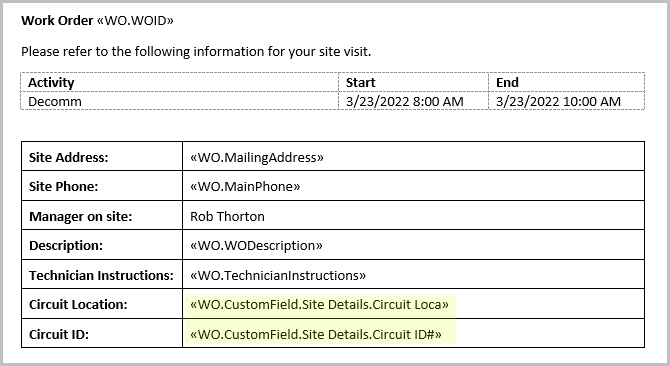
Moving on, the Circuit Location and Circuit Values fields are special because they are custom fields. You will find both in the document (just search the Generated Document Fields PDF for your custom field name (ie, ‘circuit’). We know CustomField.Site Details.Circuit Location is the correct field as we can see the value from our work order is Room 305.

Insert new MergeFields for the custom fields into the Word document.
Looking at the Manager on site field, it’s a little more complicated. Remember we defined the site manager to be the primary contact for a site. And that information is stored with the site itself. If we search the PDF for ‘thorton’, we find a field way down in the document called PrimaryContactName. Notice it is found (or scoped) under WO.Site.
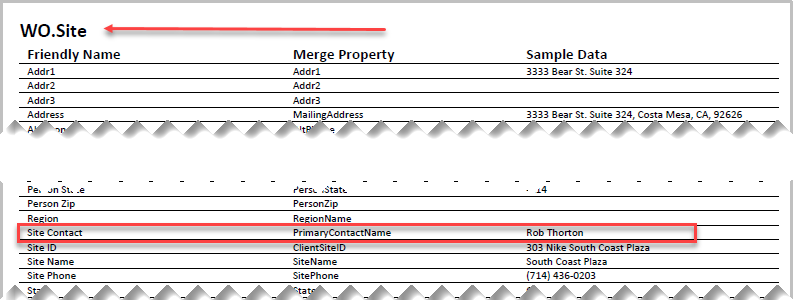
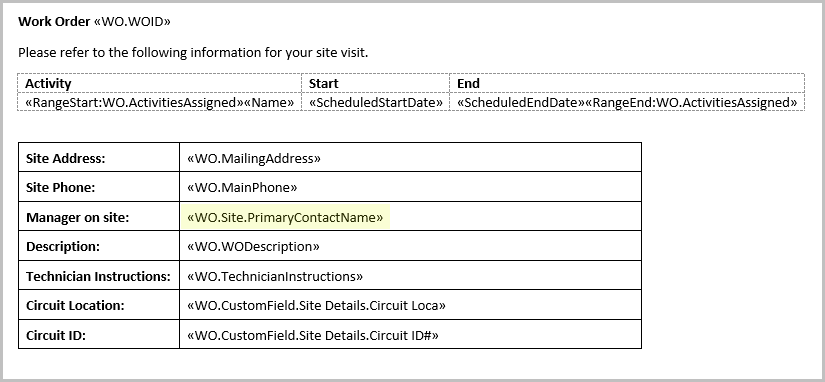
Now insert a new MergeField with a value of WO.Site.PrimaryContactName. When you find a field, just look for the header of that field’s section, and that shows you the proper “scope” to get to that property.
Finally, we need to pull in the schedule. But we don’t want to pull in the entire schedule. We just want the schedule for the logged in technician who needs to create a printable work order.
You are probably aware that one work order can contain multiple activities. We call this “one to many” thing a list. Examples of lists are numerous in BigWave. Just in the work order alone, you have comments, documents, invoice line items. All these things are lists.
The good thing is once you know how to display a list with a document template, you know how to do them all. Typically lists would be shown in a table format, but that’s not required. It’s just typical. Use your Generated Document Fields PDF to figure out which list you need.
In our case, we need special list called ActivitiesAssigned. You will find another list called Activities, but that returns all activities from the Schedule and Assign area. ActivitiesAssigned only returns the activities to which the logged in BigWave user is assigned. This way, when Cliff Ombasa (our assigned technician from earlier) prints off the work order from BigWave, it will display the correct scheduled activity for him (which is Decomm). If anyone else prints off the work order, then ActivitiesAssigned returns all activities so, in this case, it would be equivalent to the Activities property. ActivitiesAssigned is unusual in that it’s the only list property of a Work Order that has a special function, and that is for finding a schedule and printing it for the correct person. Any other list should be self-explanatory as you explore the Generated Document Fields PDF.
To create lists of things in your Word document, you use two additional MergeField fields in your Word document. These two MergeFields bracket the line, and tell BigWave to repeat that line for each item found in the list. Let’s see how that is done.
The two MergeFields are RangeStart and RangeEnd. This is how they are entered.
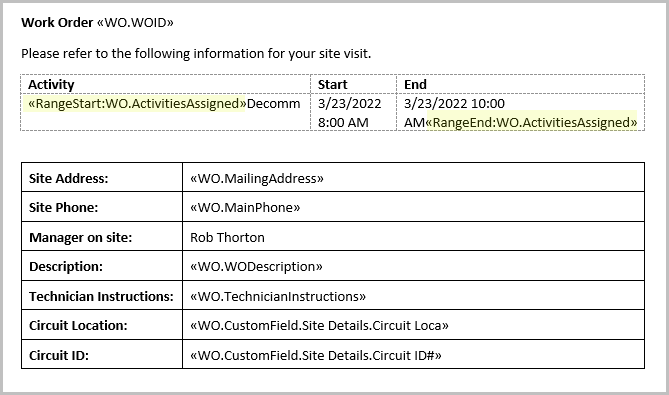
All we did was put the cursor at the start of the first cell and enter a MergeField with a value of RangeStart:WO.ActivitiesAssigned and at the end of the last cell and enter a MergeField with a value of RangeEnd:WO.ActivitiesAssigned. This tells BigWave that everything in between RangeStart and RangeEnd is a line of a list and each line should repeat for each Activity found in this list.
This brings up the subject of Scope. For most of our document the scope is the Work Order. For the list the scope is an Activity. Below everything in red is in Work Order scope (everything but the repeating line in the list), and everything in yellow is in Activity scope.
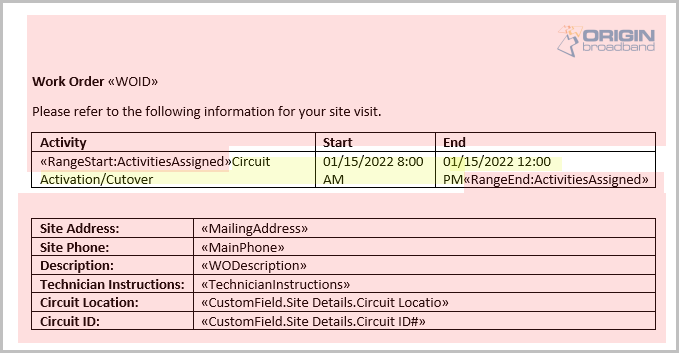
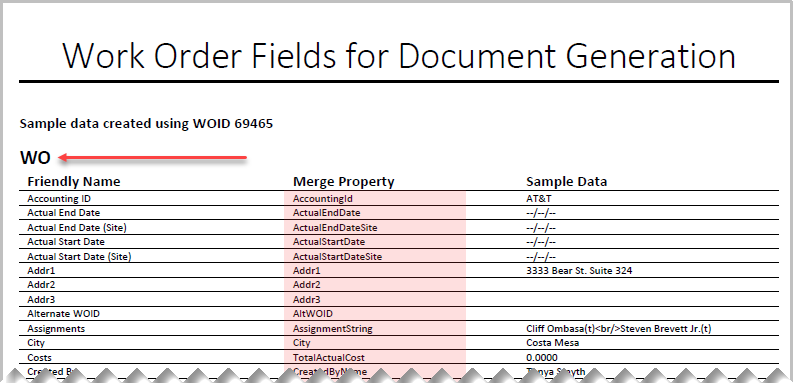
We have 2 scopes in the document. The significance of this is MergeFields defined in Work Order scope (red) are looking for properties straight off the Work Order. All these properties are enumerated in the Generated Document Fields PDF in the WO (Work Order) section as seen below. Because the scope is Work Order, then creating a MergeField with a value of WO.WODescription pulls the Long Description value from the affected Work Order (the one you are printing).
The list is Activity scope (AssignedActivities), and the fields in that scope are also found in the Generated Document Fields PDF. Notice the Sample Data doesn’t show anything for Activity scope. Currently this is a limitation of the function that creates this document, but there are just a few fields and are relatively easy to figure out which ones you need.
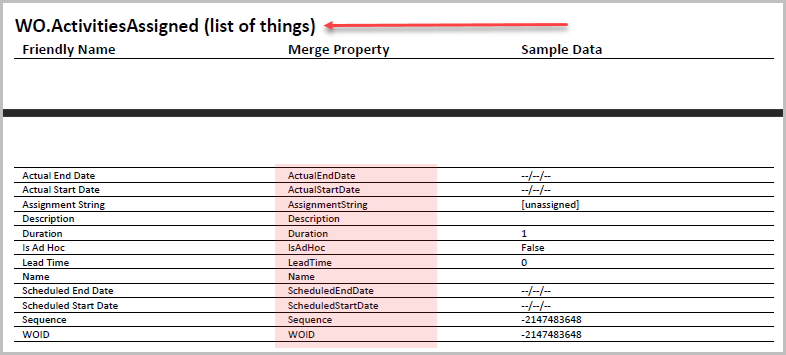
For our document we will need to pull the Name, ScheduledStartDate, and ScheduledEndDate fields. Converting our document to use these fields we end up with the following.
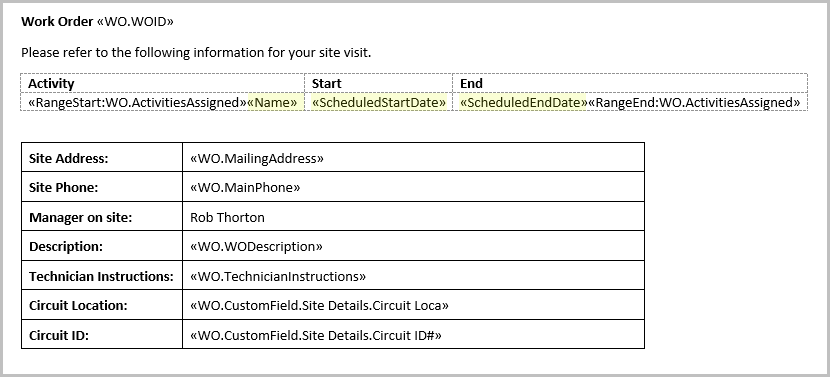
Don’t be concerned with the RangeEnd running off the page. When the document is generated, this will take care of itself.
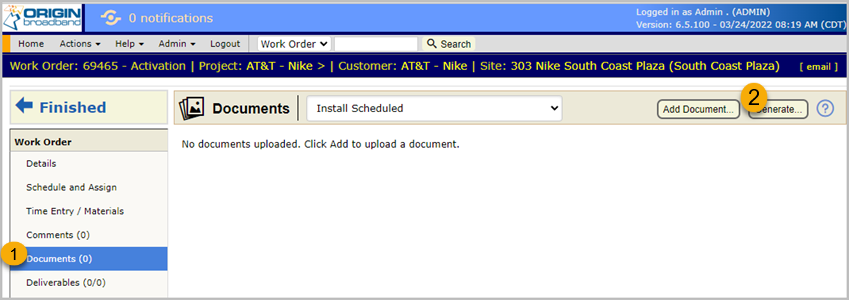
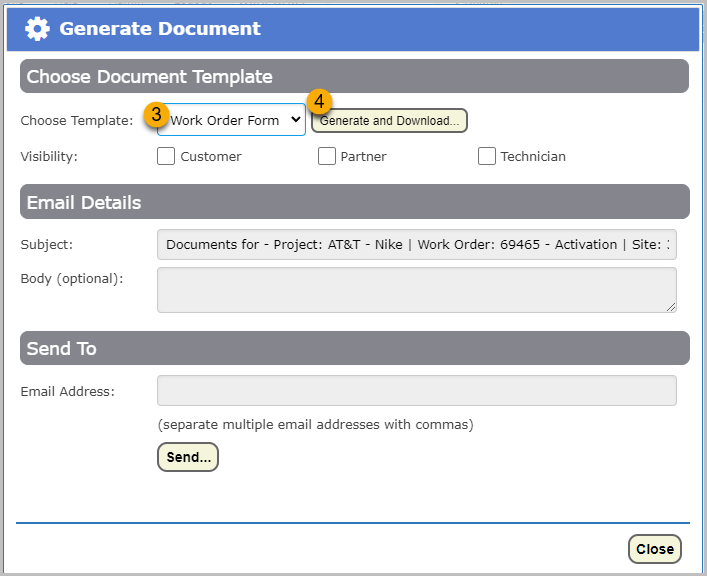
Now, to view our work, upload this document template to a project, and generate a PDF from our work order 69465. The primary method for doing this (shown earlier) is to navigate to a work order and generate the PDF from there. Here we show a different method which is should be used when you are testing your document template. Using this method is the most efficient for tweaking your document template and viewing the results.
We go into our project Setup/Document Templates.
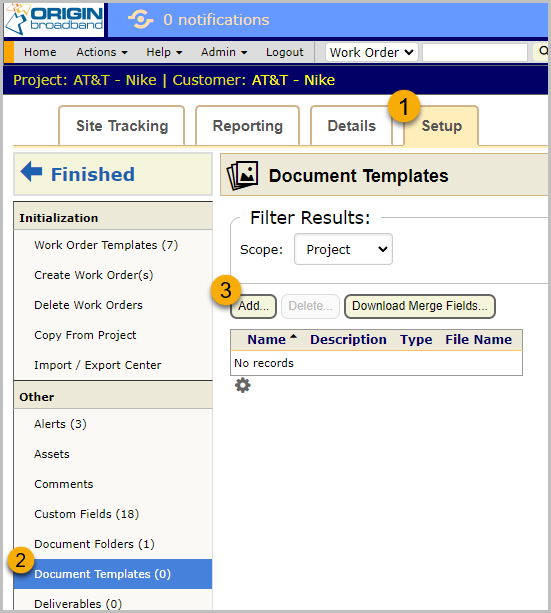
Click the Add button and upload your Microsoft Word document template. Change the Type to Work Order.
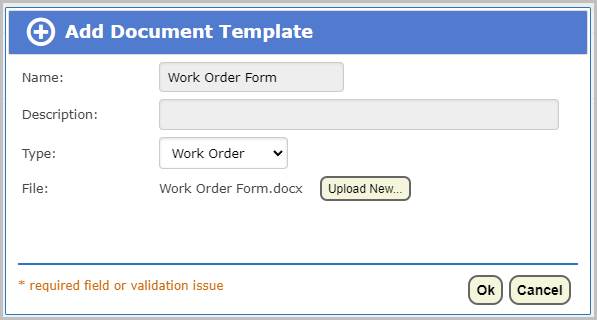
Hit Ok, and open the dialog again by clicking the row.
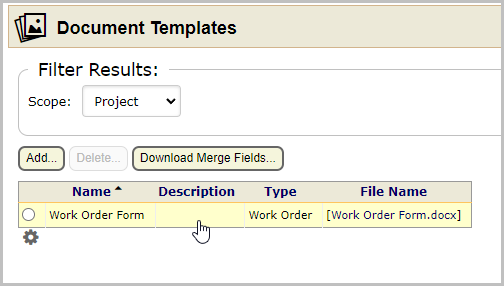
Now you can enter your work order ID and generate your document straight from here. This method enables you to easily test your work.
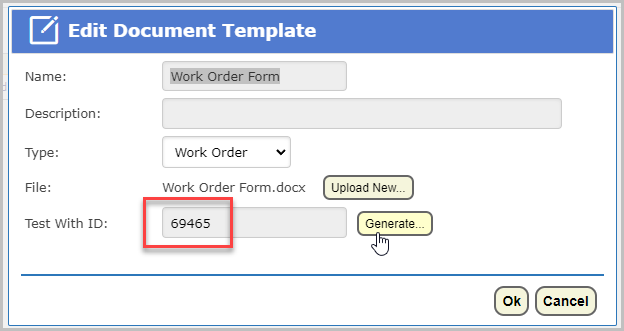
After you click Generate, a PDF is generated for the given work order. Ours looks like this.
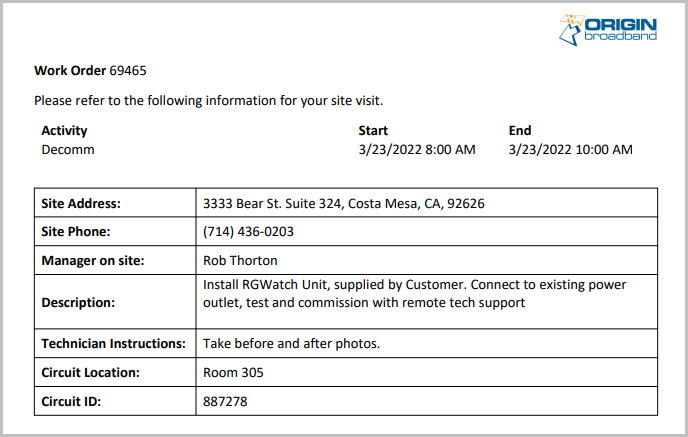
You can see the PDF now matches the original document we created. But now it pulls in the correct data from each work order.
If you need to tweak your final output, then just repeat the process of:
- Change your document template using MS Word
- Save your changes
- Upload the updated template into BigWave
- Generate a sample with an existing work order ID
- Check the results and if more work is needed then repeat!
Document Templates in BigWave enable you to, using live data from your BigWave installation, create any document in the format you desire!
